Fourth year of dental school is stressful. With all the exams, clinical summatives, graduation requirements, externship, CDCA…the list of things to do seems endless. But my first day of the CDCA exam has come and gone and scores have been uploaded! I will say, I was scared to check my scores because I wasn’t sure how the endo portion went. But it all worked out in the end!
Here’s a breakdown of exam day for the endo and prosth sections.
Overall, exam day was what I expected – it was super quiet because no one was talking because we didn’t want to fail if the CFE’s thought we were cheating and talking about our preps/teeth. Because of this the day seems very long and slow. I ended up taking a 30 min break to eat a snack after finishing the endo portion. Once the I stared on the fixed portion the day seemed to go by a lot faster since prepping these teeth was just muscle memory.
Endo
3 hours to do the RCT on #8 and access cavity for #14.
This section was what I was the most worried about – grading seemed so subjective and the molar access was difficult for me. I kept gouging the tooth when trying to de-roof the chamber but eventually after practicing multiple times, I kind of got the hang of it. For the anterior RCT I just needed to make sure I could get the cone to fit all the way to the apex because some students had trouble getting the cone to fit once they placed the sealer in the canal because it set too fast. Also, the RCT on the CDCA exam isn’t what we’d do clinically – for this exam, we cut a single cone and place it in the canal as the “RCT”.
Here are pictures of the measurements for the access cavity my school provided:


Prosth
4 hours to prep #3, #5 and #9.
The fixed section what I was most confident about going into this exam. We have been prepping these teeth since second year so it was really just about muscle memory taking over and being sure to go slow so I don’t knick the adjacent teeth or the gingiva, rounding off all my sharp line angles, and also making sure I double, triple, quadruple check all my measurements. The teeth we were working on also cut a lot easier and smoother than the teeth we practiced on at school so there was less burning of the teeth too. Overall, this section was the most straightforward. When we came in at the beginning of the day we were also given the putty to make our reduction stents during our set up time so we don’t waste time during the exam making them.
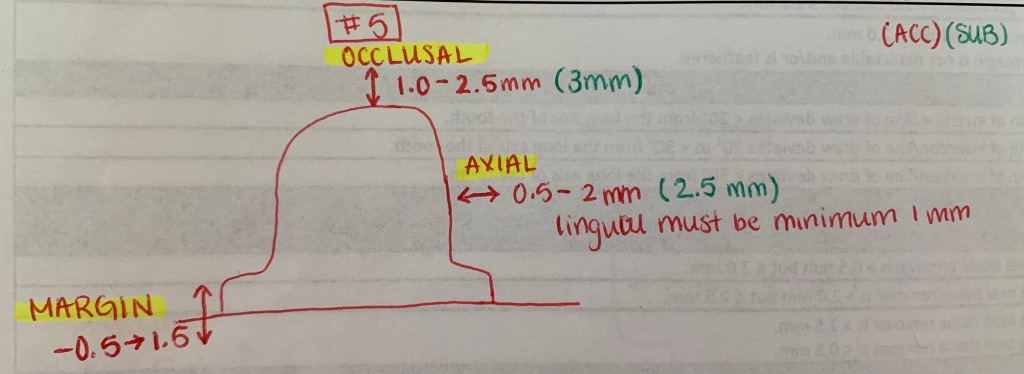
Prep/Margin type:
#3 full cast metal crown as an abutment for a 3-unit bridge – chamfer margin
#5 PFM crown as the other abutment on the 3-unit bridge – chamfer margin
#9 ceramic crown – shoulder margin
Here are the measurements for the fixed preps:


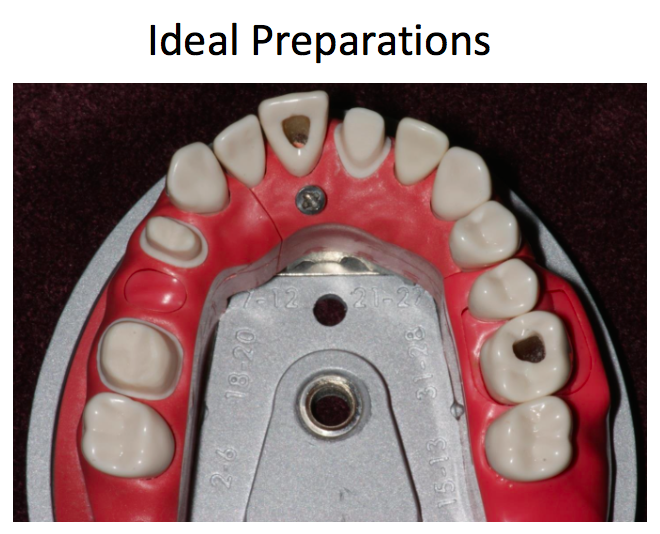
Here is a picture my school provided of the ideals preps for all the endo and fixed teeth:
If you have more questions about specifics please reach out! Also, don’t forget we are allowed to bring the manuals printed out to the exam with any notes or pictures drawn onto the pages. We can not print pictures and glue them onto the manual pages though.


Hey! Thank you for the info. It is very helpful. I have a question regarding pros – occlusal reduction. Did you do occlusal clearance by checking with the putty matrix or with opposing teeth? because when I check with putty it looks fine but when checking with opposite arch, it looks over reduced. Any comments on this.
LikeLike
Hi! You’re welcome and thanks for your comment! I used the putty matrix for all my measurements and never checked with the opposing/jaw closed. Our school’s instructor is also a cdca grader at other schools and he says they don’t check occlusal reduction with the jaw closed. They check with the putty matrix if something seems under or over reduced by a quick glance. But usually they just look at it and can tell if somethings wrong and will check with the perio probe. If they seem iffy about something they check with the putty. That’s just what we were told at my school, could be slightly different across the country/different testing sites. From my experience it really just seems that the cdca grades based on your ability to follow their specific directions and grading criteria.
LikeLike
Oh okay! Got it. I was going back and forth regarding this. Your comment is really helpful. Thanks a bunch. 🙂
LikeLike
You’re welcome!!
LikeLike
Also in your molar access how far did you keep from distal oblique groove? I feel access is too centrally placed than mesial ( what we generally find in patients) If I keep 2 mm from oblique groove, my access ends up little tiny. I know examiners also don’t like very conservative access openings.
LikeLike
I was between 1-1.5mm away from the distal oblique groove
LikeLike
Great post! Did you sear off gutta percha with heated glick? You mentioned that you “cut” a single cone. At what length did you cut it? Thanks, and congrats on being almost done!! 🙂
LikeLike
Thank you! No, we don’t use our heat ‘n touch during this exam at all. We measured our working length, then subtracted the length of the crown to get the length of the canal to the CEJ and then cut the apical tip 0.5mm from the apex to make sure we don’t extrude since that’s an automotive failure. After we have the cone cut and ready to place we put sealer on it and place into the canal with the endo pluggers as one whole piece. Obviously we don’t do this in real like haha! But this is how we did it at our school for the exam, hope this helps!
LikeLike
Hello! Thank you so much for sharing your experience! If you don’t mind sharing, would you describe your steps for cleaning and shaping the canal? I require accessory cones and would love to be able to place one master cone. Thanks again!
LikeLike
Hi! Was just wondering how long it took to get your endo/pros results?
LikeLike
I think it took about a month to get results for endo/prosth
LikeLike
Hi!! wonderful post, thanks so much! The photos are very helpful:)
Quick question regarding the access on #14- did you clean out most of the red wax from the chamber with a spoon excavator? Not sure how clear they want the area haha
LikeLike
I just cleaned it enough for me to see the canals. I didn’t fully clean them out like I did for the anterior tooth.
LikeLike
How long did it take to get your scores back?
LikeLike
I don’t remember exactly, but I think it was about a week.
LikeLike
I’ve heard that the teeth for #8 are easily fractured which would cause an automatic failure. Do you have any advice on how to avoid this?
LikeLike
When I was taking the exam my schools instructors just recommended to go slow, use burs that are either new or just used a few times so you’re not using super old burs and to NOT use heat when placing the gutta percha. When I was working on the tooth I used this advise and just didn’t rush myself, the tooth didn’t really feel fragile or anything like it would fracture
LikeLike
Hi. Thank you so much for such a helpful post. Did you polish crowns after prep? I have been reading mixed comments on different resources. What do you suggest? Thank you again for compiling such useful information.
LikeLike
No problem! Thanks for visiting my blog, I’m glad it’s helpful.
I didn’t polish my preps but I did just make sure I smoothed out all the surfaces and edges to make sure there weren’t any sharp points.
LikeLike
Thank you for your reply. Also, for PFM, where do you end shoulder margin as in how far palatally you extend your shoulder? Is it palatal/lingual to the contact points interproximally? Did you blend shoulder with chamfer or left the shoulder wings as such as some instructors teach. Thank you
And one more question, would you recommend gingival and incisal axial walls on Class III composite prep? Thanks again.
LikeLike
Did you use rotary instruments for #8 endo?
LikeLike
Nope! No rotary used during the CDCA exam. Don’t want to risk breaking a typodont tooth for this exam.
LikeLike